It’s often recommended these days to use Sap Green and Olive Green to paint leaves and trees, which is very different from the way I was taught a hundred years ago. The tradition in watercolour in the second half of the 20th century was to never use green straight from a tube, and my paintings do reflect this principle and always have done.
Yes, there is a place for Sap Green and Olive Green, but not straight from the tube! Applied to paper neat from the tube these colours are uniformly uninteresting and don’t add anything to a real watercolour. Instead, if you must use up that tube of Sap Green, add something to each stroke you use it for. A dab of Quinacridone Gold will work wonders, as will a dash of Indigo or even powerful Pthalo Blue.
Myself if I’m doing a watercolour which includes an area of foliage I pick two blues and two yellows and use them to mix up all my greens.
Here is an example of that technique in action.
I chose Ultramarine Blue, Pthalo Blue (Caribbean Blue) and Quinacridone Gold and Lemon Yellow. That gives me a warm blue (ultra) and a cool blue (pthalo) and a warm yellow (quin gold) and a cool yellow (lemon)
You will always get the purest mixes when you mix warm with warm (reddish tint) or cool with cool (blueish tint) but if you mix across the warmth, cool with warm, you will get a mix with a greyish undertone.
Here are some of the greens I talk about in the video which discusses the issue of mixing blue and yellow!
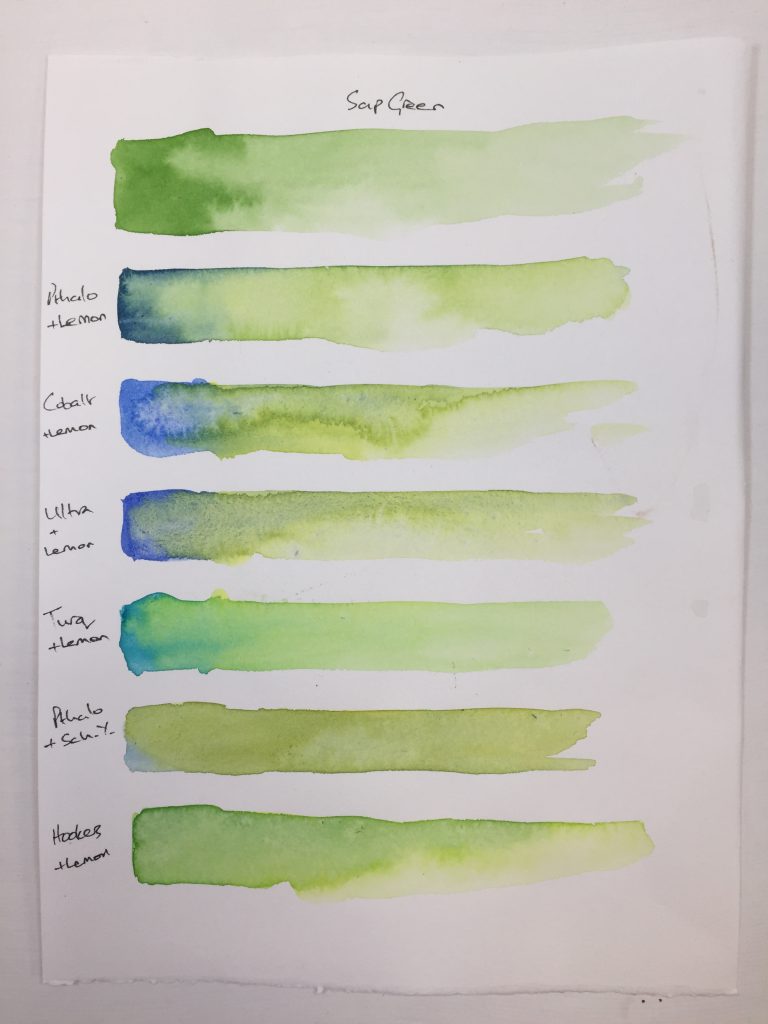
You can see here what I mixed to try to make a more interesting version of Sap Green.

And here I’m making an approximation to Olive Green which I feel is more vibrant than the tube colour.
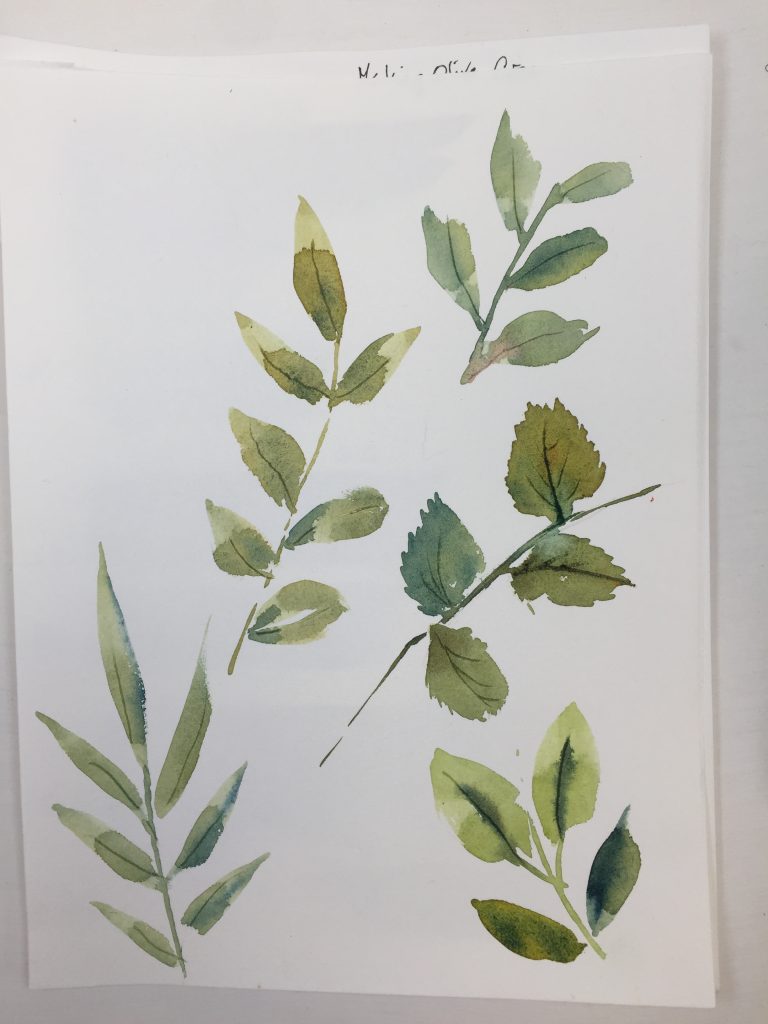
So having made some loose mixes on my large butchers tray palette, I am ready to paint some leaves.
Watch the YouTube video to see how to do this. You are best off using a large round brush to create leaves which have a variety of colours and tones in them. I used a size 14 round nylon brush. Of course, sable or a sable mix would be better in some ways as it would hold more paint, but if you are constantly changing the colours in your leaves, as you should be, a good quality nylon one will be more than adequate. Just avoid using too small a brush.
So to paint these leaves you need to make a loose mix of one yellow and one blue, and a touch of one of the other colours in your palette. Use a moderate amount of water – don’t make the paint too wishy washy as it will dry a lot lighter than it appears when wet.
Using a large round pick up a generous amount of the loose mix, and start to paint on your sheet of student’s watercolour paper. For practice, don’t use expensive Arches paper or anything similar, it’s wasteful. Use student quality watercolour, 90lb or heavier, such as this one. Please don’t use cartridge paper or copier paper as the mixes will simply not work and you will become depressed and frustrated!
The way you use your brush is as important as the colour mixing. As you load the brush with paint, shape the business end of the brush by twisting and turning it on the palette to bring the hairs into a pointed shape. Keep a light touch on the brush, hold it well back from the ferrule and spin it between your thumb and forefinger as you paint.
Avoid the currently trendy Chinese or Japanese fist grip where the brush sits in the gap between your thumb and the base of your forefinger. This gives you next to no control of the brush, will probably give you shoulder pain and looks very ugly. While this grip might be a good one for Chinese calligraphy or Japanese ink painting, that is an art to itself and not helpful for our style.
Touch the point of the brush to the paper first, then press down to paint the wider part of the leaf, then lift off with a twist of the wrist or fingers to bring the brush back to a pointed shape.
You can see me doing this on the video on YouTube – in fact in all the videos on my YouTube channel.
Change the angle of the brush to the paper for each individual leaf to give variety to your foliage. Sometimes it should be more upright, sometimes leaning forwards or backwards. Don’t give in to the urge to make meaningless dabs and dots when you are painting leaves, but keep your number of strokes to an absolute minimum. Make every stroke count!
With your loaded brush you can practice many leaf shapes before you need to reload. Your skill with this method will improve with practice and you will develop your own techniques to achieve what you like.
Also practise using the very tip of the big brush to create lines, which will be branches and stems. But at all costs avoid drawing the leaf in outline with your brush and then filling it in. Even if you are painting a wide leaf that you can’t complete in one or two strokes, don’t outline and colour in. Use a couple more strokes adjacent to the first one to achieve the size you want.
Veins can be scratched in using a sharp implement such as a feather quill, the corner of a credit card cut up, a sharp stick or a dip pen. Just scratch lightly into the damp paint to get a dark line which will represent a vein. If you wait a bit longer, the scratch will create a lighter line.
Practice makes perfect! Spend a few hours enjoying making beautiful leaves – spring greens, autumn golds, variegated plant leaves, just play for a while and enjoy. More on this subject coming soon, meanwhile don’t forget the video to accompany this post and also join our Facebook group Learn to Paint Watercolour.
Happy Painting!